Mastering Asphalt Surface Repairs: Expert Tips from Top Gun Sealcoating
Asphalt surfaces are a common sight in driveways and parking lots, cherished for their durability and long-lasting performance. But, like any other surface, they are not invincible and can suffer from wear and tear over time. Elements such as weather, heavy traffic, and neglect can lead to cracks, potholes, and other damages on your asphalt surface. If left unattended, these issues can escalate and result in costly repairs down the line. Don’t worry, though – knowing how to effectively repair your asphalt surface can save you time and money in the long run. In this article, we’ll provide you with valuable insights on asphalt repair, tailored to Top Gun Sealcoating’s expert services.
Understanding Asphalt Damage and Its Causes
To effectively repair asphalt surfaces, you need to understand what causes the damage in the first place. Several factors contribute to the deterioration of your asphalt surface, including:
- Water Damage: Water is the primary enemy of asphalt surfaces. When water seeps into cracks and crevices, it can lead to accelerated wear and tear, resulting in potholes and depressions.
- Heavy Traffic and Weight: The weight of heavy vehicles and equipment can cause damage to the top layer of asphalt, leading to depressions and cracks.
- Extreme Temperature Changes: Constant exposure to extreme temperature changes, such as freeze-thaw cycles, can also cause damage to your asphalt surface.
- Age: Over time, the asphalt surface can become brittle and develop cracks, leading to significant damage.
Identifying Types of Asphalt Damage
To determine the appropriate repair method, it’s essential to identify the types of damage on your asphalt surface. Common types of asphalt damage include:
- Potholes: Potholes develop when water seeps into the asphalt surface, freezes, and expands, causing cracks and breakage. These can range in size from small to large and can pose a safety hazard if not repaired promptly.
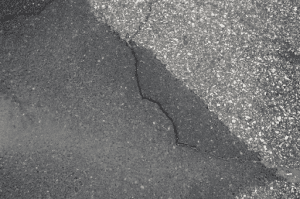
- Cracks: Cracks are another common issue, with various types requiring different repair methods. Some common crack types include hairline cracks, block cracks, and alligator cracks.
- Depressions and Ruts: These are small dips or indentations formed on the asphalt surface due to the weight of vehicles driving or parking.
- Alligator Cracking: Characterized by a spider-web pattern, alligator cracking often occurs in high-traffic or heavy-load-bearing areas.
Essential Tools and Materials for Asphalt Repair
Before you dive into repairing your asphalt surface, make sure you have the necessary tools and materials at hand. Here’s what you’ll need:
- Safety Gear: Gloves, dust masks, safety glasses, and steel-toe boots to protect yourself during the repair process.
- Shovel or Spade: To remove loose debris from the surface.
- Wire Brush: For cleaning the surface of any remaining loose material, dirt, and gravel.
- Chisel and Hammer: To remove loose or damaged material around the affected area.
- Asphalt Mix: The material used to fill holes and cracks.
- Tamp: A hand-held pavement tamper to compact the asphalt patch and make it firm.
- Asphalt Sealer: A black, rubberized liquid applied on the surface after repairs to create a protective barrier against water, oil, and UV rays.
Choosing the Right Asphalt Repair Materials
Picking the correct asphalt repair materials is vital for a long-lasting repair. Here are some common options to consider:
- Cold Mix Asphalt Patch: Ready to use and premixed, perfect for small repairs like filling holes and cracks without requiring heating.
- Hot Mix Asphalt Patch: Ideal for extensive repairs like potholes, alligator cracking, and depressions. The asphalt mix is heated and poured into the damaged area before using a compactor to even it out.
- Asphalt Sealer: Applied on the surface after repairs, the sealer fills in cracks and pores, offering protection against water, oil, and UV rays.
Preparing the Damaged Area
To start the repair process, ensure that the damaged area is clean and free of debris. Use a shovel or spade to remove loose materials and a wire brush to clean the surface thoroughly. Next, use a chisel and hammer to remove any loose or damaged material around the affected area, creating a clean and rough surface for the asphalt mix to adhere to.
Repairing Different Types of Asphalt Damage
Repairing Potholes: Fill the pothole with an asphalt mix, ensuring it is slightly higher than the surrounding surface for compaction. Both hot and cold asphalt mix options are suitable for this repair. After filling the pothole, use a hand-held pavement tamper to compact the asphalt mix, promoting bonding with the surrounding surface.
Repairing Cracks: Clean the crack’s surface with a wire brush and remove any loose debris. Fill the crack with an appropriate asphalt mix and use a tamper to compact the patch, making it firm.
Repairing Depressions and Ruts: Apply a layer of asphalt mix over the low spots and ruts, then use a compactor to even out the surface, creating a level area. Ensure the layer is slightly higher than the surrounding surface to account for compaction.
Repairing Alligator Cracking: Alligator cracking requires detailed repair work. Start by removing the damaged area, including the layers beneath it, until you reach the stabilized soil underneath. Fill the area with hot asphalt mix, making it slightly higher than the surrounding surface, and use a compactor to create a level area.
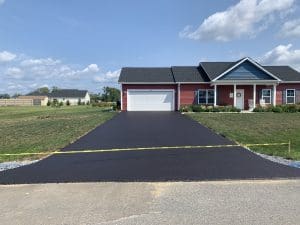
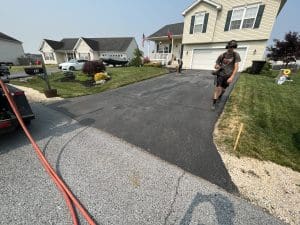
Sealing and Protecting the Repaired Surface
Once the repair work is complete, allow the asphalt mix to cure for 24-48 hours before applying the asphalt sealer. The sealer fills in pores and cracks, creating a protective barrier against water, oil, and UV rays. After applying the sealer, allow it to dry for at least 24 hours before resuming regular traffic on the surface.
Maintaining Your Asphalt Surface
Regular maintenance is key to preserving your asphalt surface and preventing further damage. Perform routine checks for damage and repair any issues promptly. Keep the surface clean by sweeping away debris regularly. Avoid using heavy machinery or equipment on the surface, as it can cause damage. Additionally, applying a fresh coat of sealer every 2-3 years will protect and extend the life of your asphalt surface.
By following these steps and utilizing Top Gun Sealcoating’s expertise, you can effectively repair your asphalt surface, ensuring its longevity and a pristine appearance for years to come. A well-maintained asphalt surface not only enhances your property’s curb appeal but also increases its value. So, don’t wait for the damage to escalate – take charge of your asphalt surface’s health and protect your investment with Top Gun Sealcoating’s reliable and top-notch services. Reach out to us today to schedule your asphalt repair and experience the difference!